Another month gone, and another 31 blocks on the stitch journal.
31 days of May
Time is flying. There is really not much more to say about that.
Summer coloursHand-dyed threads, simple stitches
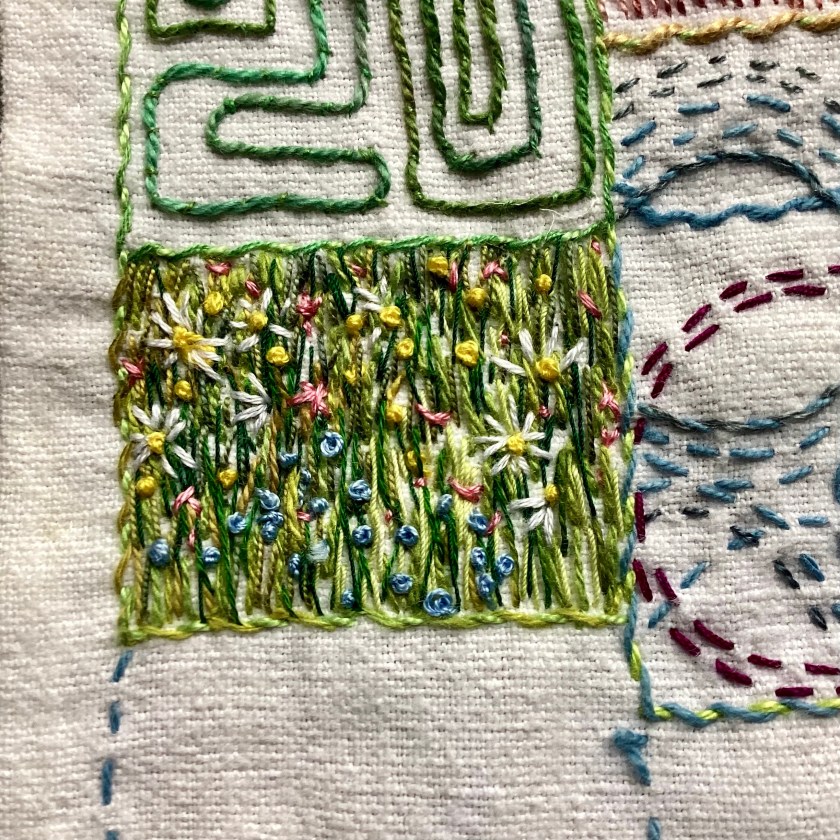
I ended with a square for no-mow May. We did this last year too but this year seems to have brought lots more buttercups and daisies, the prettiest of flowers.
No-mow May
I like the way we stand between, sometimes – between day and night, between the old month and the new. Standing still for a moment, to look back and then ahead. A bit like pausing before crossing a road. So onwards, into June:
I did a little experiment yesterday. I imagine lots of people have done this before, but it’s the first time I’ve got round to trying fabric paint to colour thread. I used Jacquard dye-na-flow liquid colour, which behaves more like dye than paint, and applied it with a brush to create a space-dyed effect.
Silk and cotton threads coloured with fabric paints
I only used three colours – lemon yellow, turquoise, and purple – with a little black to ‘sadden’ rather than darken. I soaked the threads first in water and squeezed out the excess before painting. They dried outside on the washing line. Fabric paints generally need heat to set them, and I figured if you can iron fabric, which is basically woven thread, then you can also iron thread so I gave them a quick steam with the iron when they were dry. I think I’ve read somewhere that these paints will cure in the air as well if you leave them a few days.
Silk and cotton threads, space-dye effect with paint
I quite like the pastel/watercolour effect but maybe wouldn’t water the colours down so much every time. I wondered if painting the thread would change the hand, and it does, slightly – they are still soft, but maybe not quite as soft as they would be if I’d used dye. On the whole I think I prefer dyed thread, but I found there is slightly more control over the colour with paint. It will be interesting to see how colourfast and lightfast these threads turn out to be over time. I road-tested a bit on today’s stitch journal block:
Stitch journal 29th May, hand-painted cotton crochet thread
This is not what I intended to start right now, but I’m really intrigued to know how long it will get, and how long it will take.
Let’s start at the beginning.
A while ago two things happened that made me stop and think: I read a statistic that the lifetime of a person who lives to be in their early 80s amounts to around 30,000 days. That strikes me as much, much fewer than you might expect. Life is short, even when you get to be old.
I also very luckily found a collection of antique and vintage clothing online that included (hand-stitched!) christening gowns and home-made vintage lingerie. One of the items was a silk petticoat, pre-dating elastic because the waistband was made from lingerie tape, but machine-sewn. It was simply made: a narrow A-line skirt constructed with French seams, and a flounced frill around the hem. The silk is very lightweight and billowy – similar to fine habotai.
Vintage silk petticoat, deconstructed
I wonder (and this is just a hunch that feels ‘right’) if this might be a post-war silk parachute that has been repurposed by a resourceful stitcher in the late 1940s.
So I ended up putting those two thoughts together – taking something from around 80 years ago that has potentially saved someone’s life, and using it to make something that signifies an octogenarian lifespan. There is something quite incredible about launching yourself out of an aeroplane with only a gossamer-thin canopy of worm-spit between you and the ground.
A Long Life, conception stage
So the result is a very, very long cloth, just 6” wide, with bits of vintage silk parachute/petticoat applied to a strip of brushed cotton (for stability and softness) on which I intend to place 30,000 stitches.
Vintage silk, machine-stitched seam
I’m keeping as much of the original sewing as possible.
Back fastening, vintage silk petticoat
I have no idea what 30,000 stitches will look like but I’m looking forward to finding out.
The Covid Chronicle, founded by Wendy Bliss, is a community textile art installation, currently touring in the UK. It comprises about 140 panels worked in a range of textile art techniques and records contributors’ experiences of the pandemic since the first UK lockdown. You can see the work here from today until 19th June, and from July it will be on display at Riverside Studios, near Hammersmith Bridge.
The Hammersmith venue has a huge window space that isn’t suitable for the textile art because it gets too much light, so contributors have been invited to make hearts that can be displayed there a bit like the Wall of Hearts.
I already had a couple of patchwork hearts lying around in a drawer so it was quite easy to put these together.
Patchwork heart on layered background 9” x 12”
I really like layered sheers. I like the way they reveal as well as conceal, the way they cover the background but you can still see through them if you look closely. And of course we are all like that too. Very few people get to see through all our layers.
Layered linens, silk organza and silk chiffon
The other two are slightly smaller, about 6” x 8”, and are made with eco-dyed fabrics from Jane Hunter.
Pair of hearts made from linen, cotton and wool
The white heart is just strips of cotton fabrics pieced together into a heart shape, with some decorative stitching over the seams.
Strip of silk chiffon covering the edge
I really like the scrap of eco-dyed felted wool – it’s quite thick and substantial, I’m guessing from an old wool blanket, and perfect for this. It always amazes me how these orphans and scraps find their home eventually.
Eco-dyed wool with vintage cotton lace and little seed stitches
These will be travelling to Wendy very soon, and if you’re in London in July maybe you could go and visit.
Its working title was ‘All Together Now’ but I found that gave me a constant earworm of the song with the same name, which became distracting, so it had to go. I dropped the outer words and have named it simply ‘Together’. I like the etymology – it comes from an Old English word meaning ‘to gather’ – and that’s exactly what this quilt is. It’s a gathering: of fabrics, of textures, of colours, and of time.
‘Together’ 66″ square (121 x 6″ blocks)
I have a perennial problem with making large quilts. I like working on a large scale, as a rule, but when the thing is finished I have no way of taking a decent photograph of it. I don’t have a wall big enough to hang it on (in any case, there is no hanging sleeve on this one). Usually what happens is we have to move the furniture out of the dining room, lay the quilt out on the floor, and then climb up a stepladder, hold a camera out at arms length over it and hope for the best. Textiles are very difficult to photograph at the best of times and always look so much better in real life.
Seed stitching across the central panel
The quilt is made entirely of scraps and leftovers, hand-pieced over paper using the traditional English paper-piecing method. I assembled the blocks as 6″ squares, using patches in multiples of 1″ (so for example, 1 x 1, 1 x 2, 2 x 2, etc). I then arranged the blocks by colour group, with the whites and neutrals in the centre. The fabrics are an immensely eclectic mix of very modern and very old, plain and patterned, textured and plain-weave. The oldest pieces in it are from the eighteenth century, and they sit happily next to very modern scraps and samples. Most of the fabrics are hand-dyed vintage cotton and linen, with some over-dyed modern quilting cottons. There are a few synthetics and satins in there as well. I don’t normally like shiny fabrics much but I do like the way these little squares catch the light.
The blue cornerThe red corner
The seeding stitches in the central panel create circles of negative space. Initially this was just a design decision to disrupt the straight lines created by the square blocks, but now I can see that the circles create little oases floating like bubbles across the surface. I like the way the circles are distinct but at the same time visibly still a part of their foundation.
Lots of seedingspots of time among seeding stitches
The middle layer of the quilt is cotton flannel rather than traditional quilt batting, only because that’s what I had. I didn’t want to have to buy anything for this one. The backing is pieced together from a vintage silk sari. The quilt is thin but quite heavy.
Quilt back, pieced from patterned silk sari
I am a little nervous about the longevity of the quilt. It’s designed to be decorative rather than functional, but not to hang on a wall. I imagine it displayed on a bed, ideally. I don’t know the remaining life span of the silk backing: silk tends to tear very easily as it ages, and I’m not sure how old this sari is. The quilt isn’t washable, due to all the different kinds of fibre – the very elderly patches will shred, and the hand-dyed fabrics might not be entirely colour-fast. The seeding stitches on the surface would be quite easy to pull and distort accidentally. Its new owner (when I find them) is going to have to be very careful with it. But then, very few things last for ever.
Quilt label made from embroidered vintage linen, hand-dyed. I really like the way those two embroidered arms reach out to each other.
I did think about whether it needed some sort of additional circular pattern in the outer borders, but in the end I think there’s probably enough going on in it. I’m looking forward to being able to start something a little more manageable.
I don’t know what’s happened on Instagram but suddenly I am inundated with lovely messages and many questions about the stitch journal. Where did everyone come from? I will try and answer everyone but in the meantime I thought a post covering the most frequently asked questions might be helpful.
I should point out that I did not invent the concept of the stitch journal. Claire Wellesley-Smith writes about it here, and you can read more about it in her book Slow Stitch. I decided, at the end of last year, that I would like to try a stitch journal myself. For me, it’s somewhere to place a few stitches every day, a contemplative practice to mark the passing of time, and an opportunity to reflect on anything that might have happened that day. I try not to be too literal with it – I prefer a series of abstract marks that suggest a feeling or thought – but sometimes a pictorial image just happens.
Here are some of the questions I’ve been getting, from those who might be thinking of keeping a stitch journal but don’t necessarily know where to start. The answers are not definitive, this is just how I’ve gone about it:
(1) What are you stitching on?
Several years ago, I was lucky enough to find a vintage/antique French metis sheet and I had been saving it for something special. Metis is a cotton/linen blend (I think linen warp and cotton weft) and has a lovely hand. The cotton gives it softness, and the linen gives it strength. It seemed the perfect ground for recording the passing of days, stitching the present onto the past – because most of us are a product of our experience. You don’t have to find vintage linen; any medium weight cotton or linen would be fine. Denim or canvas are probably too heavy and tough to stitch comfortably; something like a medium weight calico (this is a UK term, I think calico is referred to as muslin in the US) should be fine. My advice would be to avoid anything shiny, slippery or too textured.
antique French metis sheet
(2) How big is it?
I tore a strip from the length of the sheet which is about about 10″ wide (this includes a narrow hem down both long sides, to stop the edges fraying too much). The length is about 7 or 8 feet. If you are working with modern fabric, you can piece shorter lengths together to make it wider or longer. You can make it any shape or size, whatever is most practical for you.
(3) Are you stitching on more than one layer?
No, I am stitching on a single layer, just the sheet. If you are using a lighter-weight fabric then you might want to back it or line it. I wanted the back of the stitches to show. I think there is a very moving sense of honesty in the other side of hand embroidery and for the purposes of this piece I didn’t want to hide anything.
(4) Do you use a hoop or frame?
I rarely use a hoop or frame; I prefer to hold the work in my hands. If you are a novice embroiderer, you might find an embroidery hoop helpful as it will keep your tension more even and help to prevent puckering. I’ve been sewing by hand for a long time now and generally have a fairly good sense of tension. Having said that, I do pop the work in a hoop if I need both hands – French knots, for instance, are easier in a hoop. There are lots of online tutorials on how to use a hoop and how to work various stitches.
(5) What kind of thread/needle do you use?
I use a variety of thread – stranded cotton embroidery floss (the only type I will use is DMC – cheaper embroidery floss shreds very easily and doesn’t have the same texture), fine cotton embroidery thread, fine crochet cotton (you can often find this in charity shops; it dyes beautifully) and fine perle-type thread in silk and cotton. I dye most of my threads myself with procion reactive dye. I like variegated and space-dyed threads because of the unpredictable colour variation. I choose a needle to fit the thread – embroidery needles, crewel needles, and standard sharps/quilting needles are all fine. Your thread should pass through the eye comfortably but not too loosely.
OK, my threads get a bit tangled. Don’t we all?
(6) How do you decide where to stitch?
I designed a block template for each month when I first started the journal. The template is about 10″ wide by about 8″ deep, divided into 30 or 31 blocks to give one block per day for each month. I’ve designed the template so that the blocks tesselate slightly because I wanted the days to follow each other in a logical order, but also to fit together without any space between. Days don’t have space between each other; time just goes on forever without any gaps. I’ve also made the blocks different sizes because some days feel longer than others. Of course you can make your own template, and you can make the blocks any size and shape you want. You might want a space around your days – entirely up to you.
If a month has only 30 days, I don’t use the first division between 1 and 2. I stitch the days in the order they are numbered, because I want each day to follow the next and to share a border. February is slightly different, of course, so you can choose which blocks to miss out/merge together.
Monthly template, adaptable for 30/31 day months
Every month I trace the template onto the next section of sheeting, directly below the preceding month, and stitch the outline with basic running stitch. I have chosen a different colour for each month. I usually work a whipped stitch around the border of each block every day as I complete another section.
Template transferred to fabric with running stitch outlines
(7) Do you plan what you’re going to stitch?
There is no plan at all, this is completely intuitive. I choose a colour, thread a needle, place a stitch, and see where it goes. There are some completed blocks on the journal that I don’t like, but then there are some days I haven’t liked too so I feel this is a fair reflection of life, warts and all. I’m not trying to make a beautiful thing; I’m trying to make an honest record of time passing. Occasionally if something wonderful is happening in the garden (for instance, one of my favourite plants is flowering) then I might stitch an approximate pictogram that represents it. I generally allow between 10 and 30 minutes per day, depending on other commitments. Mostly the blocks are abstract shapes and lines, which I find more meaningful. Again, it’s all very personal, so you can plan as much or as little as you like, and you can make it as figurative or as abstract as you prefer.
(8) What are you going to do with it?
This strikes me as a slightly strange question. A stitch journal, as I understand it, is a bit like a visual diary. If you keep a written diary or journal, then it exists as a record of moments in your life. You don’t necessarily ‘do’ anything with it when it’s finished, nor does it have a functional purpose as an object other than being a reference point on which to fix your experience. This piece, when it’s finished at the end of the year, will be a completed object, not functional but with its own purpose as a visual witness of time passing. I have a previous post here where I think about how I will store the finished thing.
Plans for storing the stitch journal when it’s completed at the end of the year
I hope that this has been useful. If you’re thinking of starting a stitch journal yourself (or any form of daily stitch practice) then you can do it any way you want to, in whatever way best fits your life. You’re welcome to use or adapt my template if you want to; if you’re posting your work online or on social media, please do credit my design. You can start any time you want to, you don’t have to wait until the 1st of January – that’s just an arbitrary date that we have culturally decided is the beginning of another year. Any new beginning starts with a moment, and that moment can be now.