It was supposed to be down time, and it very nearly/probably was. The trouble is, I don’t like piles of half-finished things all over the place and I can’t sit down and relax if things need doing. And things always need doing, right?
I finished the simple quilt for the reading chair (you can see the making of the seaside-Mondrian cushion/pillow here):
reading chair looking a bit more inviting
I made a planner for 2025, using up some 150 gsm cheap drawing paper that I had on the shelf. Usually I buy a diary for planning the year, and usually I’m too busy to use it effectively. I figured if I invest time in making the thing myself then surely I will make the effort to actually plan things in it.
I made a start:
A5-size handmade year planner/diary
I made a start on forming some resolutions for 2025:
note to self: less next year
Yes, 2025 will be the Year of Less. I work too many hours. No real time off this year, no holiday – too busy doing essential improvement works on the house. My choice, and not complaining. But next year has to be different. I probably say this every year. Let’s see what happens.
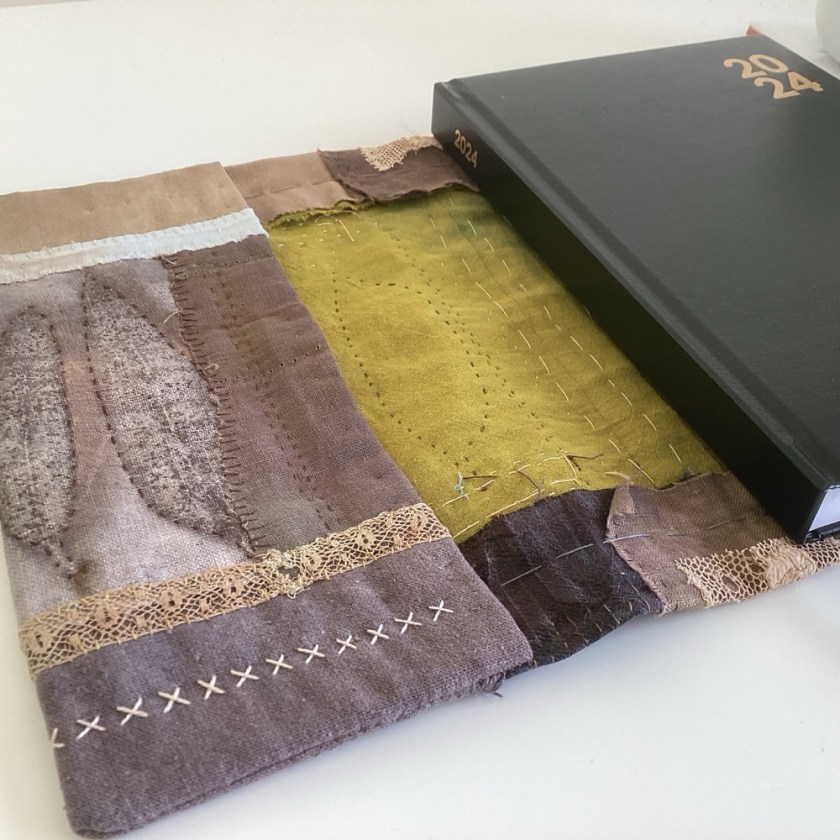
Of course I made a cover for the new planner:
2024, 2025, side by side2025 planner, back cover
I made a cover for my 2025 order book too:
order book cover, map fabric by Tim Holtz
It has pockets on the inner covers because who doesn’t like pockets?
inside front cover, space for notes. Needs ironing!
I used a bit of an old window envelope as a pocket too:
window envelope pocket
I hemmed my 2025 stitch journal fabric:
the last of the vintage linen, hemmed and ready for 2025
I didn’t quite get round to finishing the little landscapes:
still unfinished
I am not Superwoman.
This is my last post before Christmas week, and I really will be having some proper time off over the next week and a bit. I’ll be back here on New Year’s Eve with (I hope) my finished 2024 daily stitching.
For now I want to say a big thank you to everyone who has supported my work this year, especially to everyone who has bought courses, thread, fabric, and PDFs – you make it possible for me to do what I love, and I’m always grateful for that – and to everyone who takes the time to leave kind comments here and elsewhere. I wish you all the joy and peace of the season.
This one is A4 size, and it’s the sketchbook I’m using for the Laura Horn Modern Mixed Media course. So far the course content is quite different in style from what I would normally produce, but there are some interesting techniques that I might be able to adapt into some kind of landscape work. Laura is very, very good at what she does, and she demonstrates the techniques expertly.
The cover for this one is mostly layered sheer fabrics – hand-dyed silk organza, chiffon and nylon tulle, on a plain calico base. I drew some loose scribbly marks and lines on the calico first, which you can just about see under the surface, and then layered the sheers over the top to form a kind of landscape.
sketchbook, front cover
The scrap of poetry on the front cover, held in place under the top layer of nylon chiffon, is from ‘Home Thoughts in Laventie’ by Edward Wyndham Tennant.
The back is a little more simple, but broadly the same technique:
sketchbook back cover
Sheer fabrics are notoriously difficult to photograph, so some of the colours are not quite right here – textiles always look so much better in person, in any case. This detail of the back cover shows some hand-painted builder’s scrim under the top layer of chiffon.
back cover, detailfront cover, detail
As usual, I’ve made a wrap-around slip cover, so the inside covers do double duty as pockets.
inside front cover
The Modern Mixed Media course so far has been quite heavily focused on ‘botanicals’, which I’ve struggled to render on paper without it looking like someone else’s work. The best I’ve been able to do so far is a kind of scribbly variation, which I quite like.
scribbly botanicals, pen and ink/watercolour
I’m not terrifically impressed by the paper in this sketchbook, which is a Fabriano watercolour 200 gsm. The paper has a very prominent texture, which I find distracting. You can see it particularly clearly on this page:
sketchbook page
I’ve taken to collaging the pages before adding any paint, which I’m finding easier to handle.
sketchbook page, collaged with vintage papers
This page is ready for something, though I don’t know what yet. I could easily say the same about myself, most days. Let’s see what the rest of the week brings.
This week’s sketchbook cover almost made itself. I had a quarter yard of this glorious Marcia Derse ‘wabi sabi polka dot’ cotton quilting fabric that turned out to be exactly the right size for this one. When something is already the right size, I tend to take it as a sign that it was meant to be.
The light isn’t great here today, so the colours in the photos are a bit greyer than in real life.
Marcia Derse quilting cotton, wabi sabi polka dot
This sketchbook is quite big, with pages about 14″ x 11″ (roughly A3-ish). Unable to find what I wanted, I ended up making my own using some large sheets of 250 gsm mixed media paper and some very helpful online bookbinding tutorials. I even added header tape and a bookmark ribbon. The hard casing is just cardboard packaging covered with brown paper, which is why it needed a more decorative cover.
handmade sketchbook
This book is for mixed media paint experiments, which I’d like to do more of when I manage to find the time.
Labelled spine
All I did with the fabric was lay it on a calico backing to stabilise it and then outline each of the circular shapes with running stitch in a dark perle 12 cotton thread. I also added some straight stitches in very pale grey to the plain dark shapes along the spine.
Ready for action
It’s just a simple slip case, so it forms its own useful pockets in the front and back inner covers.
inside back cover
I’m not often attracted to something this bright, but I really like everything about this fabric – the varied mark-making behind the shapes, the painterly/collage style, the patterns in each circle and the colour palette. I wish I’d designed it.
I love being surprised by fabric. Looking forward to getting started in this one.
I’ve been having a tidy-up in my workroom and trying to round up All the Sketchbooks. Turns out there are a few more than I thought.
some sketchbooks
Some are complete, some are nearly complete, and some are completely empty. I do like a well-dressed sketchbook, so you know what’s going to happen next.
I have a little 6″ square Seawhite sketchbook (140 gsm cartridge paper) where I put paint scraps – leftover paint from another project, not enough for a new thing but too much to pour away. Then I go back in and add marks/other media, with no real plan. However hard I try to keep each sketchbook to a theme, they always end up being a fairly random collection of colours and marks.
6″ mark-making sketchbook
The cover for this one is made from hand-dyed silk organza and dress net, roughly cut into circles and rings, layered onto some plain calico. Then I’ve covered it with very sheer nylon chiffon and stitched some simple lines and marks over the surface to hold it all together. I’m very bad at stitching text so I’ve sandwiched a small piece of handwritten card on the spine between the chiffon and some net.
If anyone’s interested in the contents, here are a few pages showing how simple it can be:
watercolour and acrylic ink with penwatercolour with 8B pencil sketchexploring colour and patterns
I recently got some Roman Szmal watercolours to try, just a starter set of five, and I really like the Caput Mortuum and Aquarius Green:
Roman Szmal caput mortuum and Aquarius green with fine black and white pens
Mostly this book (so far) consists of various rings and circles, hence the design on the cover.
watercolours with walnut ink, marks made with cotton bud (q-tip) and cocktail stickwatercolour with Derwent drawing pencils
There are lots more books needing covers, so there’s more than enough here to keep me busy over the coming months. If you’re in the northern hemisphere, do you have long/ongoing projects planned for the coming winter?
I’m feeling settled enough in our new home to think about starting some new work, and I’ve made a start in a spiral bound square sketchbook that I’ve had for a little while. Sometimes these things only speak to you when they’re ready.
Of course I had to make a cover for it, as I do for most of my sketchbooks. I find it helps to illuminate some of the themes, as well as providing a little extra protection for the contents.
The cover wraps around the spiral binding and meets itself on the front. It’s not my usual colour palette:
wraparound cover for square sketchbook
I’m using a Two Rivers plein air pocket sketchbook, which has alternating pages of watercolour paper and cartridge paper. The pages are about 7.5″ square, so a nice manageable size.
sketchbook cover
I like pockets in sketchbooks. Actually I like pockets full stop. In my youth I went through a phase of wearing men’s vintage jackets purely because of the number and quantity of pockets, which utterly delighted me. I would keep finding extra hidden pockets all over the garment, inside and out. We no longer say the word pockets in our house. We always say pocketses, a la Gollum in The Lord of the Rings.
pocketses are great
I’ve been using the watercolour-paper pages for direct painting, and the cartridge-paper pages for collaging.
So far it’s all very loose and sketchy, blending colours, shapes and words. I’m cutting the words from an old poetry anthology to create found poems, which is helping to navigate the direction.
ink and watercolour on TwoRivers watercolour paper
I don’t know exactly what it’s going to be yet, or where it might be going, but between us (me and the work) we will find a path. Or maybe this is enough. I think it’s leading somewhere, as most things do.
sketchbook page: be prepared
Some of it is already looking like textile work.
probably the beginnings of a quilt
This page is just ink on wet paper with salt sprinkled over it. I enjoy the unpredictability of this kind of work. Play, really.
ink with salt
It’s a voyage of discovery as always, exactly like life. Travelling through time, we never know what will happen next. And yet, on we go.
Last year I bought a diary, to help me plan my newly self-employed activities for the year. I had great hopes for it. I planned to write down all the weird and wonderful national days, like National Kazoo Day and Inane Answering Message Day (28th and 30th January respectively, if you’re interested) or World Three-Legged Zombie Day (ok, that one’s yet to be confirmed).
birdie gets to work
I intended to plan and schedule blog posts, dyeing days, shop updates, accounts days, and lots of other things besides. It was a great plan.
Here’s a fairly typical diary page from this year:
blank. Of course I will recycle and reuse the paper.
It’s not that I have nothing to do.
It’s that I have So. Much. To. Do that I haven’t got time to write anything in the diary. I did fairly hit the ground running in January, and it’s been pretty much non-stop ever since, but it’s mostly reactive activity rather than planned activity. Fire-fighting is exhausting, and I see now that I do really need to set aside some time to plan things better. I’ve been so busy this year that I haven’t found the time (and if I’ve had the time then I haven’t had the energy) to make the art that I thought would be possible.
Next year I really must make time to use the diary for effective planning and scheduling, because all work and no play is no good for anyone. There are Skillshare classes I want to take. I want to become more proficient with Procreate. There are all kinds of messy mixed media avenues I want to explore. I want to make sketchbooks and draw more. I will schedule and ring-fence play times. All play and no work is no good either, of course. I will also schedule strategic planning meetings with myself and maybe even a weekly team meeting (can you be a team of one?) It’s a good plan. Let’s see if any of that works.
So I’ve bought another diary and next year I will try again. I will only use it for planning, not for writing my life story as it unfolds. It will be a purely administrative tool, holding and measuring time, and will let me see how I can use my time better.
All of the above has been a very lengthy – and probably very dull – prologue to the real content of this post. As you may know, I like to make covers for books. Just because. Making a slip cover for a book is quite quick and easy – you just need something long enough to wrap around the book and under the front/back covers and something an inch or so wider on each long side.
I placed a few scraps on a foundation cloth. The ragged vintage lace down the spine was exactly the length I needed. I always think if something fits exactly without needing to be cut or shaped, then it was probably meant to be there. The lines are fairly straight, but the photo is a bit crooked.
Diary cover
A little hand stitch here and there and it was soon done.
I stencilled 2024 onto a piece of painted card and attached it by over-laying a scrap of sheer tulle that has little dots on it and just stitched around the edge:
diary front cover in progress
Once the stitching on the front, back, and spine is complete, you can turn the long edges down so that the height of the cover is about 1/4″ longer than the height of the book. I just tack the hem down with tiny stitches on the surface because you won’t really see the wrong side.
For the wrap-around edges, I usually just try the book cover on the book, wrong side outwards, folding the long sides around book and then closing the book to make sure it’s not too tight. I can then mark the outer edge with a pin and oversew along the top and bottom edges to create the slip case for the front and back covers. There are lots of other ways to do this. I’m sure there will be many tutorials online for making book covers like this one.
stitching the slip case
Turn everything right side out again and the book just slips nicely into the cover.
half in, half outall in
I like it.
front coverback cover
And there we are, fit for the future. I can see next year coming and I’ll be ready for it.
A few people have asked how I’ve made this year’s long strip of daily stitching into a book. If you do an internet search for concertina-style books you will see that it’s quite an easy technique to adapt for cloth.
This is the process I’m using for turning my daily stitching, on a long strip of vintage bed sheet, into a cloth book.
You will need to make some sort of cover for your book, which will consist of a front cover, a spine, and a back cover – this can be all one piece, as mine is, or you can piece fabrics together so that the spine is a different colour. The cover needs to be a tiny bit bigger (a few millimetres, or a quarter of an inch or so) than your stitch journal pages.
2023 daily stitching, linen cover with simple running stitch2023 daily stitching, inside back cover
To determine the width of the spine, you will need to fold your stitch journal cloth strip, concertina-style, back and forth, into as many pages as you want to have, and then measure the height of your folded stack. The diagram below shows roughly how the construction will work.
(very rough) diagram showing cover construction and page folds
The height of the folded stack will tell you how wide the spine of the cover needs to be. The spine of my cover is about an inch wide. The first and last pages will be stitched to the inside front and back covers, the valley folds will be stitched to the spine of the cover, and the mountain folds will form the outer edges of the double-sided pages.
Once your cover is constructed, you can start to stitch your completed pages down. It’s possible to stitch all the pages down right away, but I prefer to wait until they’re finished because once they’re attached to the spine, you won’t be able to get at them so easily.
page ready to be stitched down
You can mark the inside of the spine, dividing it into six (this is the number of times you will attach a valley fold) so that you have guidelines for where to stitch the page down. You will basically be sewing every other page to the cover. A running stitch is fine, but you could also backstitch.
marking page divisions on the inside spine of the cover
I use perle 12 cotton thread for stitching the pages to the spine, but any good strong sewing thread would be fine. Here’s the process in action:
30 circles, 30 days. A few minutes of quiet stitching every day, each one a little oasis of calm.
April
I like the negative space. It’s like the untold part of the story, the gaps between thoughts and activities.
April
I’ve also been working a bit more on the cover, since this will eventually fold up into a book.
book cover for 2023 daily stitching
It’s very simple but it’s enough, I think.
April, detailApril, detail, cotton and silk threadsearly AprilApril, detail – new growth and spring rain
Next month, back to the grid – squares/blocks with occasional circles. Maybe the best of both worlds.
May, in the wings
Incidentally, you can now purchase and download my 2023 templates here – 12 different templates, approximately A4 size (or 8.5″ x 11″ letter size, if you’re not in Europe): there are some grids, some blocks, some lines, some shapes. I’m looking forward to using them myself.
I’m continuing with the linen cover for this year’s stitch journal.
Running stitch on linen
I hardly ever do straight lines intentionally. I used masking tape to keep me on the straight and narrow. Initially I started with lines of running stitch to give some sort of structure on which to build something more complex. I was thinking maybe couching, or columns of embroidery, or whipped running stitch. If ever I don’t know what to do with a blank canvas, I generally find that making a start with running stitch takes it where it needs to go. And sometimes it turns out that running stitch is all it needs. I find I’m really liking the simplicity of it.
Running stitch – straight lines! Me?
Initially it was going to be just blue, but I’ve started adding some greens and some space-dyed threads that give a flash of colour here and there. I’m using fine-ish threads – nothing thicker than perle 12 – and mostly my own hand-dyed cotton and silk. I like the unpredictable subtle colour changes that you get with hand-dyed thread.
Running stitch lines
The title box is outlined with couched silk boucle. I’m not sure what the title will be yet. The heavyweight linen came from a vintage French shirt, and is difficult to stitch on – I have had to resort to a thimble, which I hardly ever use – but beautiful quality. I can’t imagine it having been a very comfortable shirt, but I think it will be a perfect journal cover.
This week I’ve made a notebook using some light weight cotton rag paper – somewhere to collect colour palettes, swatches, and notes about colour.
Sketchbook page with colour notes
The paper signatures were easy enough – just folded pairs that could be stitched to the spine of a cover. The cover itself literally dropped through the letter box one day. I cut a corrugated cardboard mailer box to size and painted it white:
Free! Corrugated cardboard mailer cut down to size
The depth of the box turned out to be exactly the right size for a spine to fit the pile of signatures:
Signatures stitched to cardboard cover
I painted some abaca tissue paper with acrylic inks and collaged/stencilled it a bit and used that to cover the white cardboard. I’ve reinforced the spine with another layer of painted tissue.
Little book of colour (front)Little book of colour (back)
You can still see the texture of corrugated cardboard underneath the colour but it’s functioning pretty well as a book.
Next job this week is to find a way through these, when they’re dry:
Hand dyed threads – it’s like waiting for thread to dry
If I can get through them all (and if I can stop myself from keeping them!) they’ll be available from next week.