After a few weeks of very enjoyable drawing and writing, the new PDFs are out. I *think* they’re ok but let me know if you find any glaring errors and I will fire the proofreader (that’s me).
These PDFs are meant to give a little help and direction with daily stitching on the days when you hit a wall and can’t get started.
There are currently four PDFs to choose from, sixty little design sketches in each volume: Lines, Circles, Nature, and Scatter patterns, with brief stitching directions for each sketch.
There’s also a blank page in each volume for you to jot down your own designs, and once you get started you will find yourself coming up with many more ideas of your own.
The PDFs assume that you are familiar with, and able to execute, some basic stitch types. My online class, Intuitive Daily Stitching, goes through these stitches in some detail and suggests various ways in which you can be creative with some simple stitches. Alternatively, you can consult one of the many embroidery reference books or free online tutorials for help learning some simple stitches.
Occasionally people have trouble accessing the download, so there’s now a ‘Help with PDFs’ page in the shop header with the following diagram and instructions:
The cover photos show samples of some of the designs so that you can see how they might look in real life. Be as creative as you like with colours and thread types.
cover photo samples
I really enjoyed putting these together, and I hope you find them helpful. Have a fabulous week.
There hasn’t been much happening front of house for a couple of weeks because I’ve been busy back stage working on some new PDFs. If you subscribe to my YouTube channel, you might have seen a preview of this in my video earlier this week.
I’ve had a lot of messages and social media comments this year from daily stitchers asking for more direction on what to stitch. With over four years of daily stitching behind me, I have more than enough to share.
daily stitching
So I’ve spent the last few weeks developing four themed PDFs, 60 designs in each:
lines/bands/stripes
circles/spirals/swirls
flowers and foliage
little/scatter patterns
PDF volume 1 for editing
I need to work up some more samples for the front covers and find another couple of pages-worth of designs, but I think I’m nearer the end than the beginning.
I’ve had requests for a book rather than PDFs, but there’s no way I have the head space to tackle a book right now. Books can take months, often years, to get from idea to publication; I hope there will be one at some point in the future though. In the meantime PDFs are relatively simple to make, and much easier to distribute.
Also, and this has made me do the hollow gallows laugh, a couple of friends suggested the PDF thing after I’d already started quietly working on it. Responding ‘you’re never going to believe this but…’ is hardly ever convincing but I think I got away with it.
Anyway, for now – more proof-reading/editing, a little more drawing, and some quiet stitching. It’s been really enjoyable rediscovering some previous designs and working them up into samples.
sample grids ready for stitching
I hope you’re enjoying your creative stitching too.
The last day of December and the 2024 stitch journal is complete. A map of my year.
2024 stitch journal, 31″ x 30″, hand-dyed threads on vintage linen
366 days, 366 blocks, a few simple stitches marking the passing of each day.
Looking back
Days of different shapes and sizes, different colours and textures. Minutes, hours, and days that fill a life.
early 2024
This is what I mean by Stitching Life. It’s verb, noun, not adjective, noun. Stitching my life, to be more precise.
2024, detail
Every month seems to pass in a blur, however much you try to slow it down. December has been no different.
December days
I like the way this cloth displays its memories in a non-linear sequence. Because of the way I laid out the monthly blocks, the month directly above December is May, and I like the way memories of the summer sit next to the winter days. November sits underneath June, early winter sharing an improbable border with midsummer. But the flowers of summer became seeds that sleep in the winter earth, ready to wake up and grow again in the spring.
days like fields
I guess stitches are seeds too.
2024, detail
The stitched area measures about 31″ square. The fabric is the French cotton/linen bed sheet that I used last year and the year before. Next year (tomorrow!) will be the last of it.
looking back
Its function is to be a visual depiction of time passing. It’s also a mini-reference library, showing the effects you can create with a small range of very simple stitches.
It will rest in the cover that I made for it earlier in the year.
stitch journal storageit’s a wrap
It feels right to put the year away like this, on New Year’s Eve.
And away
Ready to continue tomorrow.
hello 2025
Not starting again, just continuing. That’s what we do every day, all our lives.
Next year will be long and thin, only because that’s the shape and size of the last strip of bed sheet. If you want to try something similar, there’s a stitch journal FAQ page here on my blog. There’s also my Intuitive Daily Stitching course with instructions on how to work and combine a range of simple but effective stitches. I also show you how to choose suitable fabrics, threads and needles for your daily stitching. The course is prerecorded so you can learn at your own pace, and comes with lifetime access so you can watch as many times as you like. You can find my daily stitching templates here, or of course you can design your own.
simple stitches
Tomorrow, we go on. Wishing you a happy and peaceful 2025.
One day ends and a new one begins in the unbroken chain of time that makes up our life. It really doesn’t matter what day you begin this kind of practice; all the days join up regardless of the occasion.
1st January in progress
This year I’m using my 2024 template, which I’m imagining as a kind of map of the year. I sometimes think if life came with a map we’d probably all get to where we want to be a lot more efficiently. But I guess efficiency isn’t everything and I’m glad I ended up taking the long way round – the scenic route, I suppose we might call it.
As always, there is no plan apart from the template; each day will decide for itself what it wants to be. This practice, for me, has always been about witnessing the passage of time rather than marking events or occasions. I don’t often feel the need to remember what happened on a given day; it’s enough to know that I acknowledged the time passing.
I have no idea how this cloth will look by the end of December, but then I have no idea how my life will look by then either. It will be a voyage of discovery and an adventure as always.
a beginning
I’m using the same vintage metis (linen/cotton blend) as the last two years. You can often find this kind of fabric online by searching for vintage metis, or vintage French bed sheet. I’ve only just noticed that I’ve left it in its natural state, whereas last year I dipped it in tea to dull the whiteness a little. I’ve marked my outlines with plain old biro, because I know all the lines will be covered. If you’re stitching along and (for example) you want to leave gaps between the blocks, then you will want to use a less obtrusive method for marking out your daily sections.
To begin, I’ve done a very simple whipped running stitch in perle 12 cotton and silk, with a fine textured yarn couched around the edge, to suggest a ploughed field ready for sowing some seeds.
day one: running stitch in cotton, whipped with silk thread
I’m easing back into work-mode from tomorrow and will be thinking about all the seeds of ideas that might take root. I hope some wildflowers blow in as well.
It’s early to be thinking about next year, but I’m launching my 2024 daily stitching template now for a couple of reasons.
mapping 2024
Firstly, we have accepted an unexpectedly prompt offer on our house, so it looks like we will be moving at some point in the next few months. I will need to close the shop temporarily when that happens, possibly at short notice. If we end up moving during the weeks directly preceding the start of January then the templates may be unavailable for a time.
Secondly, there is some optional preparation for next year’s template. You can either work one month at a time and add on each following month’s template as you go, or you can do some cutting and sticking to make one large template for the whole year, as I have done. Full instructions for this, including diagrams, are in the PDF.
2024 templates
I stitched a little sample just to see how it might look. It’s intended to be a kind of aerial map, a landscape seen from above. The whole thing will be about 30-31″ square or so. It’s about mapping the days to create a visual record of time passing, and thinking about the seeds we sow, the harvests we reap, and the paths we travel through the year.
2024 template sample
You can stitch field boundaries in whipped running stitch, or you can couch textured yarns and threads around each block to create something that might represent hedgerows or stone walls.
fields
And of course you don’t need to use it for daily stitching at all; you could just make a stitched sampler if you’re feeling ambitious or in need of a challenge. You can add paths, lanes, rivers, mountains – whatever you like. (If you’re new to daily stitching, you might be interested in my online course here.)
stitch journal template
It’s exactly the same as life, really. It can look unmanageable when you imagine the bigger picture but somehow we get up every morning and work our way through each day, just to keep going. We always get somewhere in the end, even if it’s not where we initially intended.
So here’s to new beginnings just beyond the horizon.
I’m enjoying these templates for 2023, which you can find here. I didn’t think there was enough green on the page so I added some impromptu leaves here and there.
daily flowers, simple stitches
All threads are equal, but some threads are more equal than others, (with apologies to George Orwell). Thicker threads can look a little out of scale at this size, and I much prefer the motifs that have been stitched with finer threads – probably perle 12 and finer.
The very simple fly stitch flower below reminds me a bit of a snowflake. Summer is always followed by autumn and winter, and winter is always followed by spring and summer. The wheel is constantly turning, and time doesn’t stand still.
simple fly stitch flower
I think of these pages as self portraits. The other side is the face we don’t generally show to the world.
the other side of July
I’ve felt a hint of autumn in the air some mornings already, in this part of the UK, and the light is starting to change. The traditional pagan calendar sees autumn beginning tomorrow, with first harvest. My August template is meant to be a kind of geometric cornucopia, loosely based on the shape of traditional corn dollies that are plaited and woven at the end of the season and kept to ensure a fruitful harvest the following year. I’m looking forward to a more autumnal colour palette.
August awaits
We found three leftover ears of wheat by the side of a farmer’s field while out walking a few years ago. The harvest had already been gathered, and these were lying on the ground. I plaited the stalks (very inexpertly, as you can see) and we hang it on the hearth at this time of year as a wish for fruitful endeavours.
And on that note, wishing you a happy and fruitful Monday 🙂
It didn’t take long really to finish this one off. I painted a wooden dowel white, added some yarn to hang it from, made a label for the back and there it is.
A few people have asked for a pattern for this wall hanging. It’s taken some getting round to, but there is now such a thing in my shop here
first page of PDF pattern17-page PDF
Isn’t it a good feeling to have something finished?
I mentioned last week that I struggle to get enough sleep in the summer because of the increased amount of light. It doesn’t get properly dark again until August in this part of the world. Night time in June and July is just perpetual twilight, and I need night to be dark. Prolonged lack of sleep makes me as cranky, irritable, and plain exhausted as anyone else, so I thought I’d try a sleep mask as suggested in a comment. I ended up with this:
padded sleep mask, with depressions for eyes and nose bridge
It was actually quite effective, if a bit weird-looking.
BUT I don’t like it. Textiley people are often very particular about the texture and quality of fabrics, and I just don’t like the feel of this. It’s made from some sort of polyester-neoprene-type stretchy fabric, and the synthetic foam padding on the face side has a very strong smell that washing and airing outside hasn’t eliminated. The strap is also quite cumbersome and the slider clip thing gets stuck in your hair.
So while the principle worked ok, I wondered if I could make something that would be any nicer. I drew round the mask and adjusted the shape slightly, and made a pattern for the padded bit that fits over your eyes. I wanted to make it in a nicer fabric and chose some silk twill in a very dark midnight blue, with silk wadding for the padded bits. Incidentally, this table top ironing board is fabulous – it has little legs that fold out so it stands about 3″ high and the board is about half the size of a normal ironing board – it’s really useful (and no, I’m not on commission or in collaboration with ironing board companies! I found it in the supermarket while doing the weekly food shop. Imagine my excitement).
silk twill, table top ironing board
I used felt as a base on the front and back for stability and structure, and also for blocking out light. Woven fabric will always let some light in through its weave. I figured out a way of attaching the padding – I just stitched it down around all the edges to hold it in place so it didn’t shift around.
face-side sleep mask with silk wadding
When I had the two halves constructed I could attach some elastic (no clips!) to the side edges. I just backstitched up and down the short edge so that the elastic is attached securely.
sleep mask front and back in progress; silk twill, stitched with fine silk threadhalf sleep mask showing clipped edges and elastic ready to be attached
And then it was just a matter of stitching the two sides together, with the elastic in between, which I did just by oversewing with wrong sides together. You could use narrow bias binding for a neater edge, I guess, or you could sew them right sides together and leave an opening to turn through. This way was good enough for me.
oversewing the two halves together
Finally I added a more decorative top stitch in a contrasting thread around the edges. And there, after a couple of hours or so, is a nice silk sleep mask – very lightweight, very comfortable, no plastic or polyester, no weird smell – and it delivered a pretty good night’s sleep too.
silk sleep mask
If you want to make one too, I’ve added a free PDF pattern download here:
I’ve had a few enquiries recently about the templates that I’m using for my 2023 Intuitive Daily Stitching, and I’m in the process of gathering together some grids and motifs into a new PDF.
Windows for March, circles for April
My linen/cotton cloth is too thick to trace directly from a paper template, so I’ve had to find alternative ways to transfer the lines and marks. I usually use a window as a light box, taping template and cloth to the glass while I transfer the shapes with a pen. I also wondered about using this iron-on transfer pen, which I’ve had for a few months and hadn’t got round to trying.
I tried it on this leaf template – (I’m planning to use this one in October – nice idea, yes? – I’m seeing red and gold falling leaves). Unaccountably, I really didn’t expect the pen to work at all. But look! I did a little squeal. I used the pen to trace around the shape on the blank side (the back of the paper template – if you print on thin paper you can just see the print on the other side of the page), placed the drawing over a scrap of linen and touched an iron (on silk setting) to the paper, and hey presto. Instant, and very easy.
Sulky iron-on transfer pen
The pen says it’s permanent, which I’m assuming means it won’t wash off, and that of course means that I will need to cover the lines with a stitched outline. But since I usually do that anyway, that’s no great problem.
Isn’t it great when a gadget works as it should? Tell me what time/labour-saving sewing tool you like to use.
Over halfway through December, and heading towards the darkest days of the year here in the UK.
Darker days
I’ve learned such a lot through making this stitch journal. I no longer think of it as a journal though; it’s become more a collection of daily stitch meditations. I will certainly make something similar next year, though probably not exactly this design. If you want to try something like this, you can download a PDF with templates and notes here.
At least once a week someone asks me what the foundation fabric is. It’s this, a vintage French bed sheet, cotton/linen blend (sometimes called metis):
French vintage cotton/linen blend bed sheet
I will stitch on this fabric again next year. I probably have enough fabric here for another four daily stitch scrolls, if I stick to the long/thin format. I find it an easy shape to work on because you can roll up the ends as you go along, which keeps it fairly compact.
The sheet holds a few memories of its previous life, one of which is a hand-stitched seam down the centre. I’ve assumed that this was a sign that it had worn well enough for a previous owner to have turned it, because parts of the sheet I’ve been stitching on (a strip torn from the outer edge) had worn very thin. Turning is where you extend the life of an old sheet, which tends to wear most in the middle where you’ve been lying on it, by cutting it down the centre and then swapping the edges – so you then sew the original outer edges together, creating a central seam and letting the worn parts become the new outer edges. Someone from the past has hand-sewn this seam down the middle:
Hand-stitched central seam
BUT there is also a darn on the outer edge, which is clearly a selvedge – so, given that the sheet appears to have been turned, but the new outer edges are selvedges (and not hemmed raw edges) I’m deducing that the fabric was possibly hand-woven on a home loom because it’s taken two widths to make one sheet. Hand looms created fabric with narrower widths than the big commercial looms, so the only way to create wider fabrics was to stitch narrower lengths together.
Vintage bed sheet with original darning
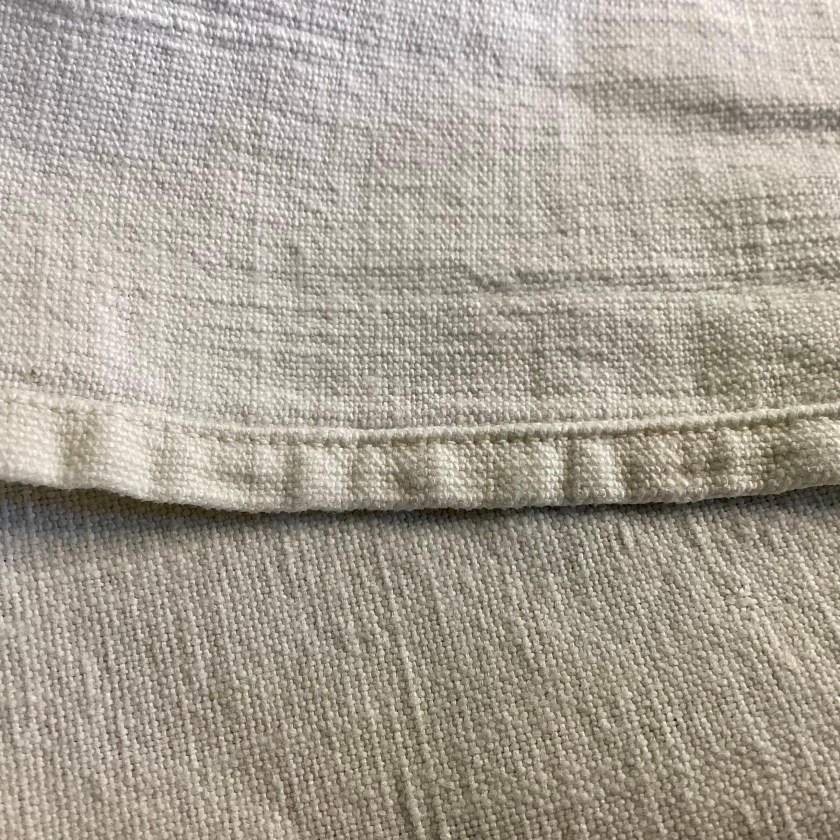
The sheet has been hemmed with impossibly tiny, regular stitches. I had assumed that this was machined, but I’ve unpicked a tiny bit and it’s just one single thread so has clearly been done by hand. It’s a very good quality fabric so will have been stitched and mended carefully.
Tiny stitches on a hand-stitched hem
The only thing I’ve been occasionally dissatisfied with this year is that the fabric is white. Sometimes I have wanted to stitch with white thread, and it just doesn’t show up well enough. The rule that I made for myself was no painting or dyeing, no added fabric or applique, just thread on a foundation. I don’t want to dye or paint it, because then I’d have to predetermine the colour, and I think that would create more limitations. I may, however, give it a very quick dip in some weak tea, just to knock back the whiteness but not enough to colour it too much.
I’m looking forward to revealing the whole thing at the end of the month. Yikes, that’s a week on Saturday! Hope you’re looking forward to seeing it too. In the meantime have a wonderful, peaceful festive season, and thank you for your friendship and support during 2022.